Welcome to SmashWiki! Log in or create an account and join the community, and don't forget to read this first!
Notices
The Skill parameter has been removed from Smasher infoboxes, and in its place are the new "Best historical ranking" and "Best tournament result" parameters. SmashWiki needs help adding these new parameters to Smasher infoboxes, refer to the guidelines here for what should be included in these new parameters.
When adding results to Smasher pages, include each tournament's entrant number in addition to the player's placement, and use the {{Trn}} template with the matching game specified. Please also fix old results on Smasher pages that do not abide to this standard. Refer to our Smasher article guidelines to see how results tables should be formatted.
Check out our project page for ongoing projects that SmashWiki needs help with.
Super Smash Bros. Ultimate

Bowser Jr. (SSBU)/Down smash: Difference between revisions

From SmashWiki, the Super Smash Bros. wiki
Jump to navigationJump to search
No edit summary
(Not even remotely close to third strongest down smash, even before all DLC)
 
Line 1: Line 1:
{{ArticleIcons|ssbu=y}}
{{competitive expertise}}
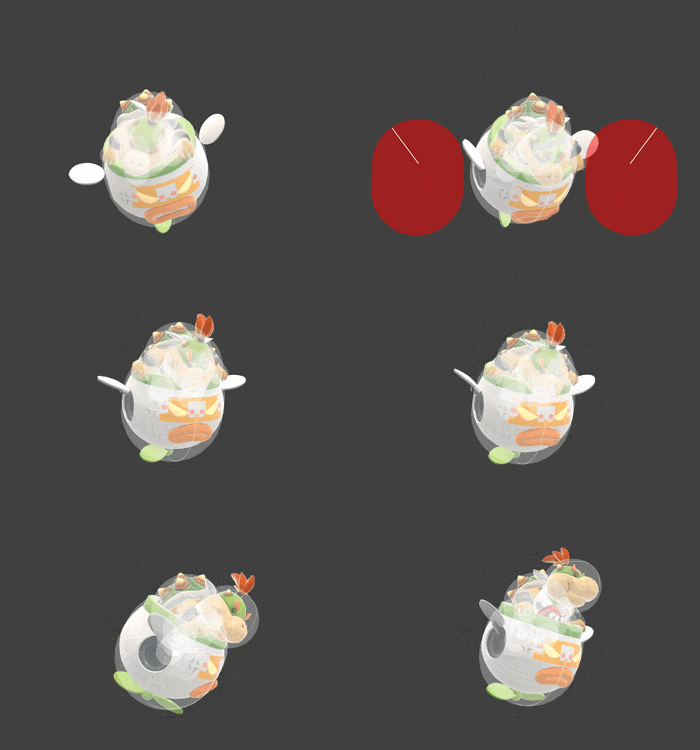
[[File:BowserJrDSmashSSBU.gif|thumb|350px|Hitbox visualization showing Bowser Jr.'s down smash.]]
[[File:BowserJrDSmashSSBU.gif|thumb|350px|Hitbox visualization showing Bowser Jr.'s down smash.]]


==Overview==
==Overview==
The Junior Clown Car slams wrecking balls on both sides. It is Bowser Jr.'s most powerful smash attack at 18%, and is the third strongest down smash in the game, making it deadly for [[punishment]]. However, it has high [[ending lag]] unlike his other smash attacks, making it equally as punishable.
==Update History==
==Update History==
'''{{GameIcon|ssbu}} {{SSBU|9.0.0}}'''

Latest revision as of 23:22, July 30, 2022

Competitive.png This article or section may require competitive expertise.
You can discuss this issue on the talk page or edit this page to improve it.
Hitbox visualization showing Bowser Jr.'s down smash.

Overview[edit]

Update History[edit]

Super Smash Bros. Ultimate 9.0.0

  • Buff Down smash has less startup (frame 15 → 12), with its total duration reduced as well (FAF 60 → 57).

Hitboxes[edit]

ID Part Rehit rate Damage SD Angle Angle type BK KS FKV Set weight Radius Bone Offset SDI× T% Clang Rebound Effect Type G A Sound Direct Hit bits Hit part Blockable Reflectable Absorbable Flinchless No GFX Heedless
0 0 0 18.0% 0 AngleIcon53.png Standard 41 91 0 HitboxTableIcon(False).png 5.2 top 0.0 3.5 to 6.5 12.5 1.2× 1.0× 0% HitboxTableIcon(Clang).png HitboxTableIcon(NoRebound).png Normal (effect) Weapon (type) HitboxTableIcon(GroundedTrue).png HitboxTableIcon(AerialTrue).png L Kick SpecialsDirect.png All All HitboxTableIcon(Blockable).png HitboxTableIcon(Unreflectable).png HitboxTableIcon(Unabsorbable).png HitboxTableIcon(False).png HitboxTableIcon(False).png HitboxTableIcon(False).png
1 0 0 18.0% 0 AngleIcon53.png Standard 41 91 0 HitboxTableIcon(False).png 5.2 top 0.0 3.5 to 6.5 -12.0 1.2× 1.0× 0% HitboxTableIcon(Clang).png HitboxTableIcon(NoRebound).png Normal (effect) Weapon (type) HitboxTableIcon(GroundedTrue).png HitboxTableIcon(AerialTrue).png L Kick SpecialsDirect.png All All HitboxTableIcon(Blockable).png HitboxTableIcon(Unreflectable).png HitboxTableIcon(Unabsorbable).png HitboxTableIcon(False).png HitboxTableIcon(False).png HitboxTableIcon(False).png

Timing[edit]

Charges between 2-3
Hitboxes 12-14
Interruptible 57
Animation length 62
FrameIcon(Lag).png FrameIcon(LagChargeS).png FrameIcon(LagChargeE).png FrameIcon(Lag).png FrameIcon(Lag).png FrameIcon(Lag).png FrameIcon(Lag).png FrameIcon(Lag).png FrameIcon(Lag).png FrameIcon(Lag).png FrameIcon(Lag).png FrameIcon(Hitbox).png FrameIcon(Hitbox).png FrameIcon(Hitbox).png FrameIcon(Lag).png FrameIcon(Lag).png FrameIcon(Lag).png FrameIcon(Lag).png FrameIcon(Lag).png FrameIcon(Lag).png FrameIcon(Lag).png FrameIcon(Lag).png FrameIcon(Lag).png FrameIcon(Lag).png FrameIcon(Lag).png FrameIcon(Lag).png FrameIcon(Lag).png FrameIcon(Lag).png FrameIcon(Lag).png FrameIcon(Lag).png FrameIcon(Lag).png FrameIcon(Lag).png FrameIcon(Lag).png FrameIcon(Lag).png FrameIcon(Lag).png FrameIcon(Lag).png FrameIcon(Lag).png FrameIcon(Lag).png FrameIcon(Lag).png FrameIcon(Lag).png FrameIcon(Lag).png FrameIcon(Lag).png FrameIcon(Lag).png FrameIcon(Lag).png FrameIcon(Lag).png FrameIcon(Lag).png FrameIcon(Lag).png FrameIcon(Lag).png FrameIcon(Lag).png FrameIcon(Lag).png FrameIcon(Lag).png FrameIcon(Lag).png FrameIcon(Lag).png FrameIcon(Lag).png FrameIcon(Lag).png FrameIcon(Lag).png FrameIcon(Interruptible).png FrameIcon(Interruptible).png FrameIcon(Interruptible).png FrameIcon(Interruptible).png FrameIcon(Interruptible).png FrameIcon(Interruptible).png
Legend (1 square = 1 frame)
Lag
Lag time
ChargeCharge
Charge interval
Hitbox
Hitbox
Interruptibility
Interruptible