[dismiss]
| Welcome to SmashWiki! Log in or create an account and join the community, and don't forget to read this first! |
| Notices |
|---|
| The Skill parameter has been removed from Smasher infoboxes, and in its place are the new "Best historical ranking" and "Best tournament result" parameters. SmashWiki needs help adding these new parameters to Smasher infoboxes, refer to the guidelines here for what should be included in these new parameters. |
| When adding results to Smasher pages, include each tournament's entrant number in addition to the player's placement, and use the {{Trn}} template with the matching game specified. Please also fix old results on Smasher pages that do not abide to this standard. Refer to our Smasher article guidelines to see how results tables should be formatted. |
| Check out our project page for ongoing projects that SmashWiki needs help with. |
Mewtwo (SSBU)/Neutral attack/Infinite: Difference between revisions
From SmashWiki, the Super Smash Bros. wiki
Jump to navigationJump to search
Raul Retana (talk | contribs) m (Added hitstun/shieldstun) |
No edit summary |
||
| (2 intermediate revisions by one other user not shown) | |||
| Line 1: | Line 1: | ||
{{ArticleIcons|ssbu=y}} | {{ArticleIcons|ssbu=y}} | ||
{{competitive expertise}} | {{competitive expertise}} | ||
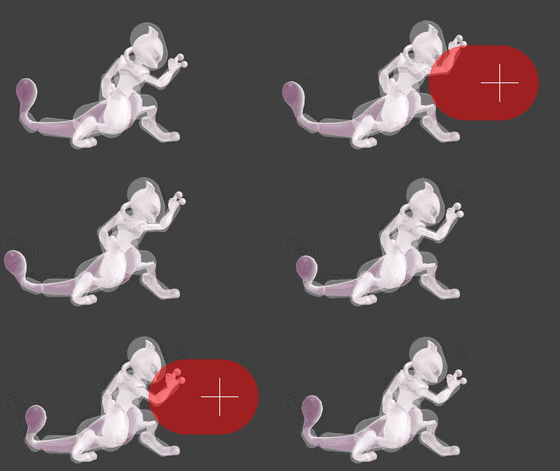
[[File:MewtwoRapidJabSSBU.gif|thumb| | [[File:MewtwoRapidJabSSBU.gif|thumb|280px|Hitbox visualization showing Mewtwo's rapid jab.]] | ||
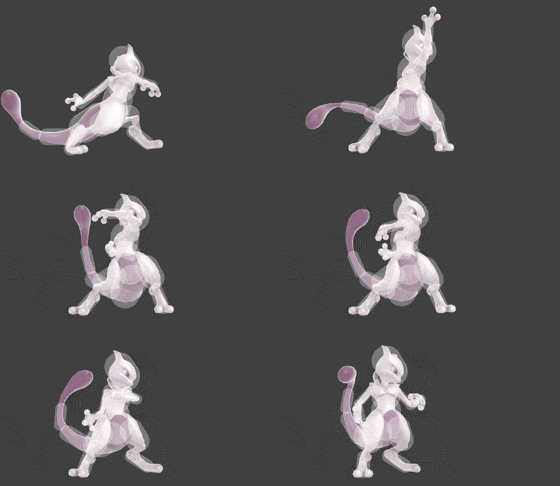
[[File:MewtwoRapidJabFinisherSSBU.gif|thumb| | [[File:MewtwoRapidJabFinisherSSBU.gif|thumb|280px|Hitbox visualization showing Mewtwo's rapid jab finisher.]] | ||
==Overview== | ==Overview== | ||
==Hitboxes== | ==Hitboxes== | ||
{{UltimateHitboxTableHeader}} | {{UltimateHitboxTableHeader}} | ||
! Hitstun | !Hitstun | ||
! Shieldstun | !Shieldstun | ||
{{HitboxTableTitle|Rapid jab|42}} | {{HitboxTableTitle|Rapid jab|42}} | ||
{{UltimateHitboxTableRow | {{UltimateHitboxTableRow | ||
| Line 14: | Line 14: | ||
|damage=0.8% | |damage=0.8% | ||
|angle=361 | |angle=361 | ||
|af=3 | |||
|bk=8 | |bk=8 | ||
|ks=10 | |ks=10 | ||
| Line 32: | Line 33: | ||
}} | }} | ||
|'''+3''' frames | |'''+3''' frames | ||
| | |4× | ||
{{HitboxTableTitle|Rapid jab finisher|42}} | {{HitboxTableTitle|Rapid jab finisher|42}} | ||
{{UltimateHitboxTableRow | {{UltimateHitboxTableRow | ||
| Line 38: | Line 39: | ||
|damage=2.5% | |damage=2.5% | ||
|angle=361 | |angle=361 | ||
|af=3 | |||
|bk=82 | |bk=82 | ||
|ks=100 | |ks=100 | ||
| Line 54: | Line 56: | ||
|rebound=f | |rebound=f | ||
}} | }} | ||
|— | |||
|— | |||
{{UltimateHitboxTableRow | {{UltimateHitboxTableRow | ||
|id=1 | |id=1 | ||
|damage=2.5% | |damage=2.5% | ||
|angle=361 | |angle=361 | ||
|af=3 | |||
|bk=82 | |bk=82 | ||
|ks=100 | |ks=100 | ||
| Line 74: | Line 79: | ||
|rebound=f | |rebound=f | ||
}} | }} | ||
|— | |||
|— | |||
{{UltimateHitboxTableRow | {{UltimateHitboxTableRow | ||
|id=2 | |id=2 | ||
|damage=2.5% | |damage=2.5% | ||
|angle=361 | |angle=361 | ||
|af=3 | |||
|bk=82 | |bk=82 | ||
|ks=100 | |ks=100 | ||
| Line 94: | Line 102: | ||
|rebound=f | |rebound=f | ||
}} | }} | ||
|— | |||
|— | |||
|} | |} | ||
==Timing== | ==Timing== | ||
Interruptibility and animation length are | After one full loop, releasing the attack button at any point causes the infinite to transition into the finisher. Interruptibility and animation length are for the finisher only. | ||
{|class="wikitable" | {|class="wikitable" | ||
!Loop points | |||
|2-3, 24-25 | |||
|- | |||
!Rapid Jab | !Rapid Jab | ||
|5, 8, 11, 14 | |5, 8, 11, 14, 17, 20, 23 | ||
|- | |- | ||
!Finisher | !Finisher | ||
Latest revision as of 17:34, July 3, 2022
Overview[edit]
Hitboxes[edit]
Timing[edit]
After one full loop, releasing the attack button at any point causes the infinite to transition into the finisher. Interruptibility and animation length are for the finisher only.
| Loop points | 2-3, 24-25 |
|---|---|
| Rapid Jab | 5, 8, 11, 14, 17, 20, 23 |
| Finisher | 6-7 |
| Interruptible | 41 |
| Animation length | 47 |
Lag time |
Hitbox |
Loop point |
Interruptible |
|


