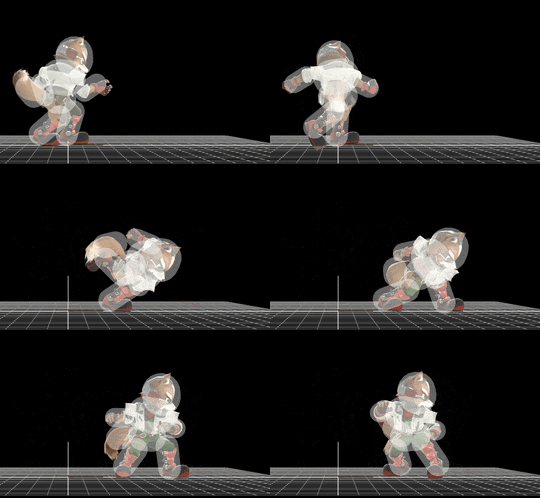
Fox (SSB4)/Forward throw: Difference between revisions
From SmashWiki, the Super Smash Bros. wiki
Jump to navigationJump to search
No edit summary |
SuperSqank (talk | contribs) |
||
| (One intermediate revision by one other user not shown) | |||
| Line 1: | Line 1: | ||
{{ArticleIcons|ssb4=y}} | {{ArticleIcons|ssb4=y}} | ||
[[File:FoxThrowForward.gif|thumb|270px|Hitbox visualization showing Fox's forward throw.]] | [[File:FoxThrowForward.gif|thumb|270px|Hitbox visualization showing Fox's forward throw.]] | ||
==Overview== | ==Overview== | ||
{{competitive expertise}} | {{competitive expertise}} | ||
Releases the opponent and quickly performs a cross, launching them forward. Can lead into a dash attack or up smash at low to high percentages if the opponent does not DI away or tech. It is also Fox's strongest throw, but it does not start KOing until extremely high percentages. | Releases the opponent and quickly performs a cross, launching them forward. Can lead into a dash attack or up smash at low to high percentages if the opponent does not DI away or tech. It is also Fox's strongest throw, but it does not start KOing until extremely high percentages. | ||
== | ==Throw and Hitbox Data== | ||
===Hitbox=== | |||
=== | {{SSB4HitboxTableHeader|special=y}} | ||
{{ | {{SSB4SpecialHitboxTableRow | ||
{{ | |||
|id=0 | |id=0 | ||
|part=0 | |part=0 | ||
| Line 25: | Line 14: | ||
|sd=1 | |sd=1 | ||
|angle=48 | |angle=48 | ||
|af=3 | |||
|bk=10 | |bk=10 | ||
|ks=100 | |ks=100 | ||
| Line 42: | Line 32: | ||
}} | }} | ||
|} | |} | ||
===Throw=== | |||
{{SSB4ThrowTableHeader}} | |||
{{SSB4ThrowTableRow | |||
|id=0 | |||
|damage=3% | |||
|angle=40 | |||
|af=3 | |||
|bk=35 | |||
|ks=130 | |||
|fkv=0 | |||
|noff=t | |||
|bn=0 | |||
|type=Throwing | |||
|sfx=None | |||
|slvl=S | |||
}} | |||
{{SSB4ThrowTableRow | |||
|id=1 | |||
|damage=3% | |||
|angle=361 | |||
|af=3 | |||
|bk=60 | |||
|ks=100 | |||
|fkv=0 | |||
|noff=t | |||
|bn=0 | |||
|type=Throwing | |||
|sfx=None | |||
|slvl=S | |||
}} | |||
|} | |||
==Timing== | |||
{|class="wikitable" | |||
!Invincibility | |||
|1-18 | |||
|- | |||
!Hitbox | |||
|10-11 | |||
|- | |||
!Throw Release | |||
|12 | |||
|- | |||
!Animation length | |||
|33 | |||
|- | |||
!Interruptible | |||
|34 | |||
|} | |||
{{FrameStripStart}} | |||
{{FrameStrip|t=Lag|c=9}}{{FrameStrip|t=Hitbox|c=2|e=HitboxThrowS}}{{FrameStrip|t=Lag|c=22|s=LagThrowE}} | |||
|- | |||
{{FrameStrip|t=Invincible|c=18}}{{FrameStrip|t=Vulnerable|c=15}} | |||
{{FrameStripEnd}} | |||
{{FrameIconLegend|lag=y|hitbox=y|throw=y|vulnerable=y|invincible=y}} | |||
{{MvSubNavFox|g=SSB4}} | {{MvSubNavFox|g=SSB4}} | ||
[[Category:Fox (SSB4)]] | [[Category:Fox (SSB4)]] | ||
[[Category:Forward throws (SSB4)]] | [[Category:Forward throws (SSB4)]] | ||
Latest revision as of 04:26, November 23, 2020
Overview[edit]
Releases the opponent and quickly performs a cross, launching them forward. Can lead into a dash attack or up smash at low to high percentages if the opponent does not DI away or tech. It is also Fox's strongest throw, but it does not start KOing until extremely high percentages.
Throw and Hitbox Data[edit]
Hitbox[edit]
Throw[edit]
| ID | Damage | Angle | BK | KS | FKV | Bone | FFx | Type | Effect | Sound | |
|---|---|---|---|---|---|---|---|---|---|---|---|
| 0 | 3% | Forwards | 35 | 130 | 0 | 0 | None | ||||
| 1 | 3% | Forwards | 60 | 100 | 0 | 0 | None | ||||
Timing[edit]
| Invincibility | 1-18 |
|---|---|
| Hitbox | 10-11 |
| Throw Release | 12 |
| Animation length | 33 |
| Interruptible | 34 |
Lag time |
Hitbox |
Vulnerable |
Invincible |
Throw point |
|

