Space Pirate Rush: Difference between revisions
Daniel1204 (talk | contribs) No edit summary |
(Added more information.) |
||
| Line 12: | Line 12: | ||
==Overview== | ==Overview== | ||
Space Pirate Rush is a [[command grab]] that drags its target across the ground before throwing them; this can also be initiated in the air to drag an opponent to the ground and do the grounded animation, or into the blast zone. The attack can rack up a great deal of damage very quickly, as grabbing and canceling in the shortest possible | Space Pirate Rush is a [[command grab]] that drags its target across the ground before throwing them; this can also be initiated in the air to drag an opponent to the ground and do the grounded animation, or into the blast zone. The attack can rack up a great deal of damage very quickly, as grabbing and canceling in the shortest possible time frame can deal as much as 12% while dragging across a stage like Battlefield can deal well over 30%. | ||
The opponent can mash out of the drag to end it, but Ridley can also jump directly out of the throwing animation. In this situation, the frame advantage is even no matter that character, with a 30 frame release animation for both characters<ref>https://docs.google.com/spreadsheets/d/1xo3HMzGnx9Nt73u0sZF1rSZlKDWahC5Kd_qMrP1dWd8/edit?usp=sharing SPR Mashout Analysis</ref>. As a result, the Ridley player can try to out-frame the opponent close-up. Most of the time, [[Ridley (SSBU)/Neutral attack|neutral attack]] and [[Ridley (SSBU)/Forward tilt|forward tilt]] are used, though grabs and mixups are possible. The grab release distance depends on how far into the drag Ridley is; the later it is, the further the pushback goes. The base mashing time depends on the difference between Ridley and the opponent's [[percentage]] with 30% thresholds. If the opponent is damaged 30% more than Ridley, it will be harder to mash out of, and so on. Should the thresholds be equal (eg. both characters are at 60%), it will be the same mash threshold as if they were both at 0%<ref>https://imgur.com/Kglz8Ek Mashout%s arranged by Ridley's; %s marked with an asterisk(*) are mashable until 999% but one missed input allows the drag.</ref>. | |||
The move otherwise ends when a ledge is reached, or in a stage with a [[walk-off]], the [[blast line]]. It also KOs Ridley first if used as a [[sacrificial KO]], similar to [[Flying Slam]], and the move is easier to mash out of the more percentage Ridley has compared to the victim. However, the grab release does have advantages off certain stages against certain opponents, letting Ridley release them underneath a stage and recover. | |||
The move has high base knockback but below average scaling, launching a fair distance at low percentages but not reliably killing until 130% and over, and the victim can survive even longer by using DI to aim their trajectory higher. If Ridley collides with a wall or other impassable object during the animation, the target is slammed against a wall and is subjected to a sort of stage spike. Ridley moves incredibly fast during the drag animation, even faster than Sonic's dash speed, and can crash into other fighters during the process. The move can also be used for recovery in the air, though it's rather poor for that purpose. | |||
This attack is brutally effective on walk-off stages, as Ridley's ability to cancel out of the move while launching the grabbed opponent can allow him to net very easy kills without sacrificing himself in the process, though it requires steady timing as Ridley can still jump into the blast zone if canceled too late. | This attack is brutally effective on walk-off stages, as Ridley's ability to cancel out of the move while launching the grabbed opponent can allow him to net very easy kills without sacrificing himself in the process, though it requires steady timing as Ridley can still jump into the blast zone if canceled too late. | ||
Revision as of 11:30, June 13, 2020
| Space Pirate Rush | |
|---|---|
 Ridley using the Space Pirate Rush. | |
| User | Ridley |
| Universe | Metroid |
Space Pirate Rush (グラビングスクラッチ, Grabbing Scratch) is Ridley's side special move in Super Smash Bros. Ultimate.
Overview
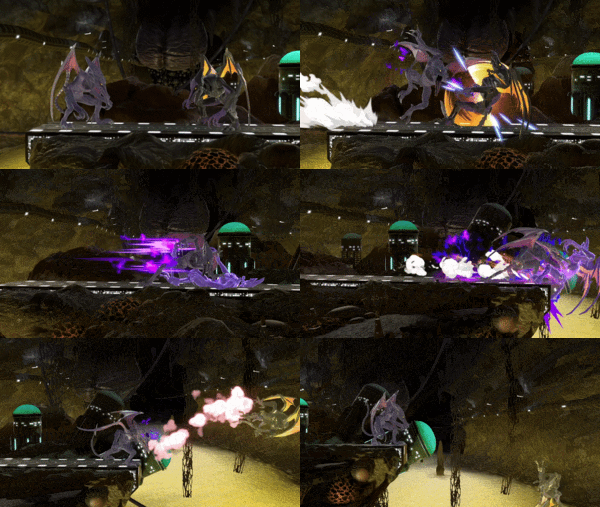
Space Pirate Rush is a command grab that drags its target across the ground before throwing them; this can also be initiated in the air to drag an opponent to the ground and do the grounded animation, or into the blast zone. The attack can rack up a great deal of damage very quickly, as grabbing and canceling in the shortest possible time frame can deal as much as 12% while dragging across a stage like Battlefield can deal well over 30%.
The opponent can mash out of the drag to end it, but Ridley can also jump directly out of the throwing animation. In this situation, the frame advantage is even no matter that character, with a 30 frame release animation for both characters[1]. As a result, the Ridley player can try to out-frame the opponent close-up. Most of the time, neutral attack and forward tilt are used, though grabs and mixups are possible. The grab release distance depends on how far into the drag Ridley is; the later it is, the further the pushback goes. The base mashing time depends on the difference between Ridley and the opponent's percentage with 30% thresholds. If the opponent is damaged 30% more than Ridley, it will be harder to mash out of, and so on. Should the thresholds be equal (eg. both characters are at 60%), it will be the same mash threshold as if they were both at 0%[2].
The move otherwise ends when a ledge is reached, or in a stage with a walk-off, the blast line. It also KOs Ridley first if used as a sacrificial KO, similar to Flying Slam, and the move is easier to mash out of the more percentage Ridley has compared to the victim. However, the grab release does have advantages off certain stages against certain opponents, letting Ridley release them underneath a stage and recover.
The move has high base knockback but below average scaling, launching a fair distance at low percentages but not reliably killing until 130% and over, and the victim can survive even longer by using DI to aim their trajectory higher. If Ridley collides with a wall or other impassable object during the animation, the target is slammed against a wall and is subjected to a sort of stage spike. Ridley moves incredibly fast during the drag animation, even faster than Sonic's dash speed, and can crash into other fighters during the process. The move can also be used for recovery in the air, though it's rather poor for that purpose.
This attack is brutally effective on walk-off stages, as Ridley's ability to cancel out of the move while launching the grabbed opponent can allow him to net very easy kills without sacrificing himself in the process, though it requires steady timing as Ridley can still jump into the blast zone if canceled too late.
Instructional quote
| Smashes an opponent into the ground then drags them along. Tilting up or pressing attack throws them forward. |
Origin
Ever since Super Metroid, Ridley has been shown utilizing variations of a grab attack. This move is based primarily on the introductory cutscene for Ridley in Super Smash Bros. Brawl, in which he grabs Samus and drags her across the wall of his fighting arena. After Brawl's release, Metroid: Other M and Metroid: Samus Returns both reference the cutscene as an actual attack in Ridley's moveset.
Gallery
Trivia
- On any stage that flattens the characters' models (such as Dream Land GB), if Sonic uses his Homing Attack and lands on a specific spot near the left edge, using and landing Space Pirate Rush on Sonic will cause Sonic to be immediately KO'd due to his position being set beyond the blast lines[3]. The glitch has since been patched.
- While dragging an opponent, Ridley moves at such a high speed that he can even outrun Sonic in a race and outpace the racetrack of Big Blue momentarily.
References
- ^ https://docs.google.com/spreadsheets/d/1xo3HMzGnx9Nt73u0sZF1rSZlKDWahC5Kd_qMrP1dWd8/edit?usp=sharing SPR Mashout Analysis
- ^ https://imgur.com/Kglz8Ek Mashout%s arranged by Ridley's; %s marked with an asterisk(*) are mashable until 999% but one missed input allows the drag.
- ^ Video of the glitch in-game

