Super Smash Bros. 4

Lucario (SSB4)/Forward smash: Difference between revisions

From SmashWiki, the Super Smash Bros. wiki
Jump to navigationJump to search
No edit summary
Line 4: Line 4:
==Overview==
==Overview==
{{competitive expertise}}
Lucario performs a double palm thrust, which releases a small burst of [[Aura]]. If Lucario is at max aura, this is the strongest smash attack in the game, reliably KOing anyone at 25% from the center of {{SSB4|Final Destination}} when fully charged.
Lucario performs a double palm thrust, which releases a small burst of [[Aura]]. If Lucario is at max aura, this is the strongest smash attack in the game, reliably KOing anyone at 25% from the center of {{SSB4|Final Destination}}, or at 0% near the ledge when fully charged.


==Hitboxes==
==Hitboxes==

Revision as of 15:51, November 19, 2018

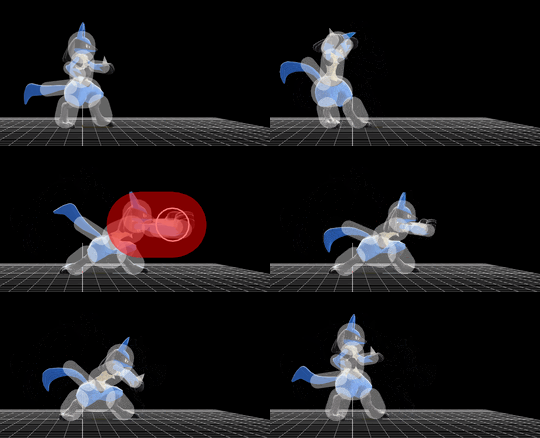
Hitbox visualization showing Lucario's forward smash.

Overview

Competitive.png This article or section may require competitive expertise.
You can discuss this issue on the talk page or edit this page to improve it.

Lucario performs a double palm thrust, which releases a small burst of Aura. If Lucario is at max aura, this is the strongest smash attack in the game, reliably KOing anyone at 25% from the center of Final Destination, or at 0% near the ledge when fully charged.

Hitboxes

ID Part Damage SD Angle BK KS FKV Radius Bone Offset SDIx T% Clang Rebound Type Effect G A Sound Direct
Clean hit
0 0 16% 0 Sakurai angle 40 106 0 5.5 0 0.0 8.0 10.2 1.0x 1.0x 0% HitboxTableIcon(Clang).png HitboxTableIcon(Rebound).png Hand (type) Aura (effect) HitboxTableIcon(GroundedTrue).png HitboxTableIcon(AerialTrue).png L Aura SpecialsDirect.png
Late hit
0 0 13% 0 Sakurai angle 40 106 0 3.3 0 0.0 8.0 18.2 1.0x 1.0x 0% HitboxTableIcon(Clang).png HitboxTableIcon(Rebound).png Hand (type) Aura (effect) HitboxTableIcon(GroundedTrue).png HitboxTableIcon(AerialTrue).png M Aura SpecialsDirect.png

Timing

Charges between 1-2
Clean hit 22-23
Late hit 24-25
Animation length 54
FrameIcon(LagChargeS).png FrameIcon(LagChargeE).png FrameIcon(Lag).png FrameIcon(Lag).png FrameIcon(Lag).png FrameIcon(Lag).png FrameIcon(Lag).png FrameIcon(Lag).png FrameIcon(Lag).png FrameIcon(Lag).png FrameIcon(Lag).png FrameIcon(Lag).png FrameIcon(Lag).png FrameIcon(Lag).png FrameIcon(Lag).png FrameIcon(Lag).png FrameIcon(Lag).png FrameIcon(Lag).png FrameIcon(Lag).png FrameIcon(Lag).png FrameIcon(Lag).png FrameIcon(Hitbox).png FrameIcon(HitboxChangeS).png FrameIcon(HitboxChangeE).png FrameIcon(Hitbox).png FrameIcon(Lag).png FrameIcon(Lag).png FrameIcon(Lag).png FrameIcon(Lag).png FrameIcon(Lag).png FrameIcon(Lag).png FrameIcon(Lag).png FrameIcon(Lag).png FrameIcon(Lag).png FrameIcon(Lag).png FrameIcon(Lag).png FrameIcon(Lag).png FrameIcon(Lag).png FrameIcon(Lag).png FrameIcon(Lag).png FrameIcon(Lag).png FrameIcon(Lag).png FrameIcon(Lag).png FrameIcon(Lag).png FrameIcon(Lag).png FrameIcon(Lag).png FrameIcon(Lag).png FrameIcon(Lag).png FrameIcon(Lag).png FrameIcon(Lag).png FrameIcon(Lag).png FrameIcon(Lag).png FrameIcon(Lag).png FrameIcon(Lag).png
Legend (1 square = 1 frame)
Lag
Lag time
ChargeCharge
Charge interval
Hitbox
Hitbox
FrameIcon(HitboxChangeS).pngFrameIcon(HitboxChangeE).png
Hitbox change