Mii Gunner (SSBU)/Down special/Custom 2: Difference between revisions
From SmashWiki, the Super Smash Bros. wiki
Jump to navigationJump to search
(Created page with "{{ArticleIcons|ssbu=y}} {{disambig2|the hitbox visualization in ''Super Smash Bros. Ultimate''|the move itself|Absorbing Vortex}} File:MiiGunnerAbsorbingVortexSSBU.gif|thumb...") |
Iron Warrior (talk | contribs) mNo edit summary |
||
| (2 intermediate revisions by 2 users not shown) | |||
| Line 5: | Line 5: | ||
{{competitive expertise}} | {{competitive expertise}} | ||
==Overview== | ==Overview== | ||
==Changes from {{SSBU|Ness}}'s [[Ness (SSBU)/Down special|PSI Magnet]]== | |||
*{{nerf|The hitbox doesn't repeat when the move is held.}} | |||
*{{buff|The hitbox is bigger (8.5u → 12.5u).}} | |||
*{{change|The aerial version has less set knockback (70 → 40).}} | |||
*{{nerf|Gunner must hold the vortex for longer before releasing it (minimum frames: 9 → 12).}} | |||
*{{buff|It has less ending lag (FAF 10 → 7).}} | |||
*{{nerf|The windbox at the end lasts for a shorter time (9 frames → 2). This also prevents it from rehitting, reducing its ability to push opponents.}} | |||
*{{buff|The windbox has higher set knockback (11 → 30), making it more effective at pushing opponents away than a single hit from PSI Magnet's windbox.}} | |||
*{{buff|It doesn't reduce vertical momentum as much upon activation (multiplier: 0.5 → 0.8), allowing it to stall jumps better.}} | |||
*{{nerf|However, unlike PSI Magnet, it also reduces horizontal momentum slightly. It also doesn't make Gunner as floaty (gravity while in use: 0.027 → 0.03) which combined with the above change makes it less effective at stalling if Mii Gunner is already falling.}} | |||
==Hitboxes== | ==Hitboxes== | ||
{{UltimateHitboxTableHeader}} | {{UltimateHitboxTableHeader}} | ||
| Line 57: | Line 67: | ||
==Timing== | ==Timing== | ||
The hitbox does not reappear with the absorption loop. | |||
{|class="wikitable" | {|class="wikitable" | ||
!Hitbox | !Hitbox | ||
|1-6 | |1-6 | ||
|- | |- | ||
!Windbox | !Absorption | ||
|7-18+ | |||
|- | |||
!Loop points | |||
|6-7, 18-19 | |||
|- | |||
!Windbox (from loop) | |||
|1-2 | |1-2 | ||
|- | |- | ||
!Interruptible ( | !Interruptible (from loop) | ||
|7 | |25 (7) | ||
|- | |- | ||
!Animation length ( | !Animation length (from loop) | ||
|26 | |44 (26) | ||
|} | |} | ||
{{FrameStripStart}} | {{FrameStripStart}} | ||
{{FrameStrip|t=Lag|c=6|e=LagLoopS}}{{FrameStrip|t=Hitbox|c=6|s=HitboxLoopE}}{{FrameStrip|t=Lag|c= | {{FrameStrip|t=Lag|c=6|e=LagLoopS}}{{FrameStrip|t=Hitbox|c=6|s=HitboxLoopE}}{{FrameStrip|t=Lag|c=6|e=LagLoopS}}{{FrameStrip|t=FlinchlessHitbox|c=2|s=FlinchlessHitboxLoopE}}{{FrameStrip|t=Lag|c=4}}{{FrameStrip|t=Interruptible|c=20}} | ||
|- | |- | ||
{{FrameStrip|t=Blank|c=6|e=BlankLoopS}}{{FrameStrip|t=Absorb|c= | {{FrameStrip|t=Blank|c=6|e=BlankLoopS}}{{FrameStrip|t=Absorb|c=12|s=AbsorbLoopE|e=AbsorbLoopS}}{{FrameStrip|t=Blank|c=26|s=BlankLoopE}} | ||
{{FrameStripEnd}} | {{FrameStripEnd}} | ||
Latest revision as of 13:07, May 16, 2022

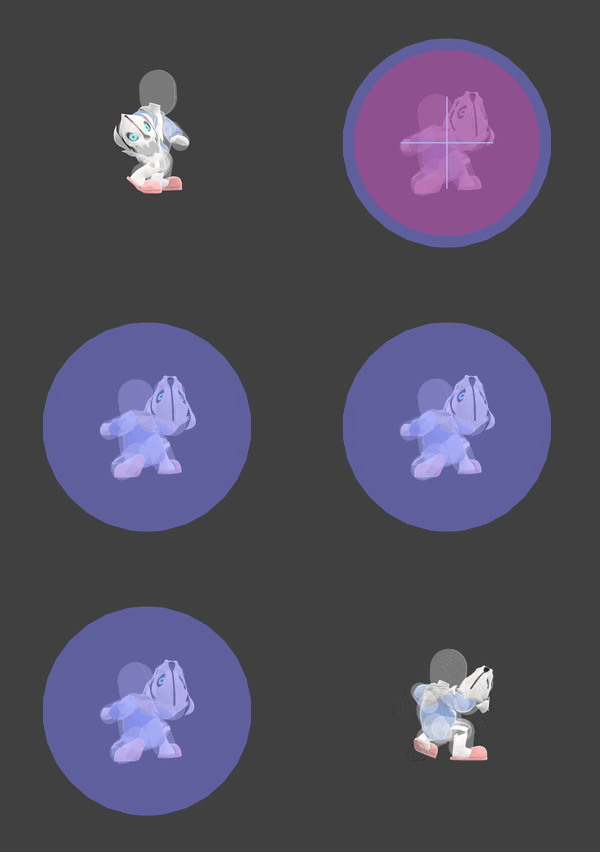
Hitbox visualization showing Mii Gunner's down special 3, Absorbing Vortex.
Overview[edit]
Changes from Ness's PSI Magnet[edit]
 The hitbox doesn't repeat when the move is held.
 The hitbox is bigger (8.5u → 12.5u).
 The aerial version has less set knockback (70 → 40).
 Gunner must hold the vortex for longer before releasing it (minimum frames: 9 → 12).
 It has less ending lag (FAF 10 → 7).
 The windbox at the end lasts for a shorter time (9 frames → 2). This also prevents it from rehitting, reducing its ability to push opponents.
 The windbox has higher set knockback (11 → 30), making it more effective at pushing opponents away than a single hit from PSI Magnet's windbox.
 It doesn't reduce vertical momentum as much upon activation (multiplier: 0.5 → 0.8), allowing it to stall jumps better.
 However, unlike PSI Magnet, it also reduces horizontal momentum slightly. It also doesn't make Gunner as floaty (gravity while in use: 0.027 → 0.03) which combined with the above change makes it less effective at stalling if Mii Gunner is already falling.
Hitboxes[edit]
Timing[edit]
The hitbox does not reappear with the absorption loop.
| Hitbox | 1-6 |
|---|---|
| Absorption | 7-18+ |
| Loop points | 6-7, 18-19 |
| Windbox (from loop) | 1-2 |
| Interruptible (from loop) | 25 (7) |
| Animation length (from loop) | 44 (26) |
Lag time |
Hitbox |
Loop point |
Absorb |
Flinchless hitbox |
|
