mNo edit summary |
mNo edit summary |
||
| (12 intermediate revisions by 6 users not shown) | |||
| Line 1: | Line 1: | ||
{{ArticleIcons|ssbb=y}} | {{ArticleIcons|ssbb=y}} | ||
{|class="wikitable" style="float:right; margin:4pt;" | |||
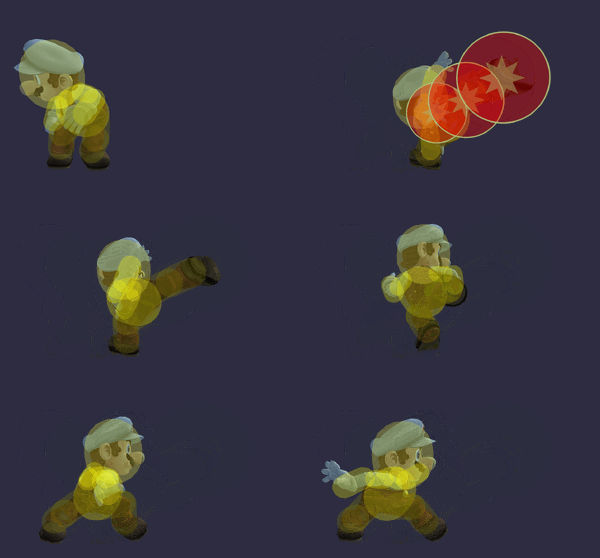
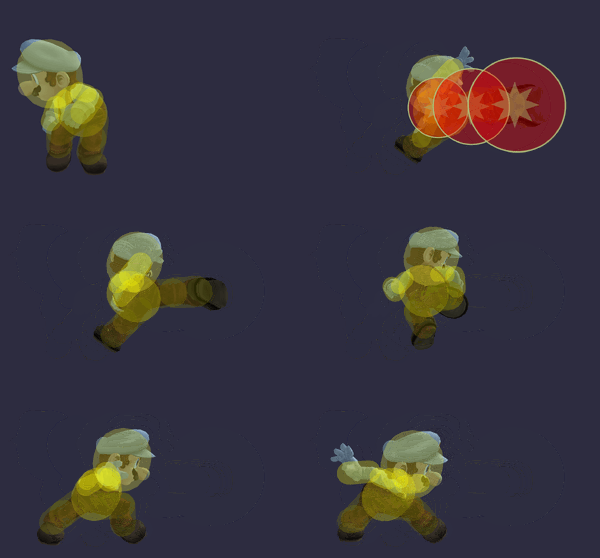
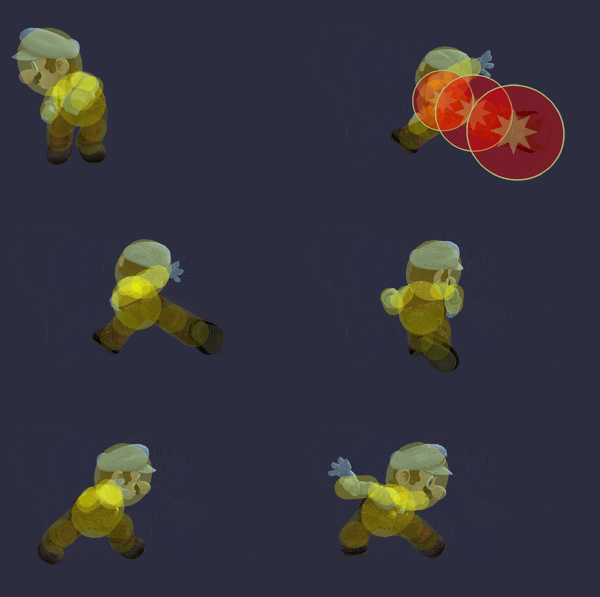
!colspan=5|Mario forward tilt hitbox visualizations | |||
|- | |||
!↗ | |||
|[[File:MarioFTiltUpSSBB.gif|300px]] | |||
|- | |||
!→ | |||
|[[File:MarioFTiltSSBB.gif|300px]] | |||
|- | |||
!↘ | |||
|[[File:MarioFTiltDownSSBB.gif|300px]] | |||
|- | |||
|} | |||
==Overview== | ==Overview== | ||
While very fast in [[start-up]] and [[ending lag]], the move's poor [[reach]] limits its capability as a [[spacing]] move. It mainly serves as a quick [[punish]] attack, though with its low [[damage]] output and [[knockback]], and having no followup potential, it doesn't accomplish much when landed. It has slightly more base knockback when aimed down, though the move still won't have real KO potential under 200%, and the increase in base knockback is far from enough to make it useful for hitting opponents off the [[stage]]. Overall, while it's not a terrible move, it's not very useful, and it pales in comparison to most other [[forward tilt]]s. | |||
While very fast in [[start-up]] and [[ending lag]], the move's poor [[reach]] limits its capability as a [[spacing]] move. It mainly serves as a quick [[punish]] attack, though with its low [[damage]] output and [[knockback]], and having no followup potential, it doesn't accomplish much when landed. It has slightly more base knockback when aimed down, though the move still won't have real KO potential under 200%, and the increase in base knockback is far from enough to make it useful for hitting opponents off the [[stage]]. Overall, while it's not a terrible move, it's not | |||
===Post hit data=== | ===Post hit data=== | ||
| Line 16: | Line 28: | ||
==Hitboxes== | ==Hitboxes== | ||
{{BrawlHitboxTableHeader}} | {{BrawlHitboxTableHeader}} | ||
{{HitboxTableTitle|Angled up | {{HitboxTableTitle|Angled up / angled forward|24}} | ||
{{BrawlHitboxTableRow | {{BrawlHitboxTableRow | ||
|id=0 | |id=0 | ||
|damage=8% | |damage=8% | ||
| Line 28: | Line 39: | ||
|bn=17 | |bn=17 | ||
|ypos=216000 | |ypos=216000 | ||
|rawflags=00111001100000110000010001000000 | |||
|rawflags= | |||
}} | }} | ||
{{BrawlHitboxTableRow | {{BrawlHitboxTableRow | ||
|id=1 | |id=1 | ||
|damage=8% | |damage=8% | ||
| Line 46: | Line 51: | ||
|bn=16 | |bn=16 | ||
|ypos=72000 | |ypos=72000 | ||
|rawflags=00111001100000110000010001000000 | |||
|rawflags= | |||
}} | }} | ||
{{BrawlHitboxTableRow | {{BrawlHitboxTableRow | ||
|id=2 | |id=2 | ||
|damage=8% | |damage=8% | ||
| Line 65: | Line 64: | ||
|ypos=72000 | |ypos=72000 | ||
|zpos=-120000 | |zpos=-120000 | ||
|rawflags=00111001100000110000010001000000 | |||
|rawflags= | |||
}} | }} | ||
{{HitboxTableTitle|Angled down|24}} | {{HitboxTableTitle|Angled down|24}} | ||
{{BrawlHitboxTableRow | {{BrawlHitboxTableRow | ||
|id=0 | |id=0 | ||
|damage=8% | |damage=8% | ||
| Line 84: | Line 77: | ||
|bn=17 | |bn=17 | ||
|ypos=216000 | |ypos=216000 | ||
|rawflags=00111001100000110000010001000000 | |||
|rawflags= | |||
}} | }} | ||
{{BrawlHitboxTableRow | {{BrawlHitboxTableRow | ||
|id=1 | |id=1 | ||
|damage=8% | |damage=8% | ||
| Line 102: | Line 89: | ||
|bn=16 | |bn=16 | ||
|ypos=72000 | |ypos=72000 | ||
|rawflags=00111001100000110000010001000000 | |||
|rawflags= | |||
}} | }} | ||
{{BrawlHitboxTableRow | {{BrawlHitboxTableRow | ||
|id=2 | |id=2 | ||
|damage=8% | |damage=8% | ||
| Line 121: | Line 102: | ||
|ypos=72000 | |ypos=72000 | ||
|zpos=-120000 | |zpos=-120000 | ||
|rawflags=00111001100000110000010001000000 | |||
|rawflags= | |||
}} | }} | ||
|} | |} | ||
| Line 145: | Line 121: | ||
{{FrameStripStart}} | {{FrameStripStart}} | ||
{{FrameStrip|t=Lag|c=4}}{{FrameStrip|t=Hitbox|c=3}}{{FrameStrip|t=Lag|c=17}}{{FrameStrip|t=Interruptible|c=8}} | {{FrameStrip|t=Lag|c=4}}{{FrameStrip|t=Hitbox|c=3}}{{FrameStrip|t=Lag|c=17}}{{FrameStrip|t=Interruptible|c=8}} | ||
{{FrameStripEnd}} | |||
{{FrameIconLegend|lag=y|hitbox=y|interruptible=y}} | {{FrameIconLegend|lag=y|hitbox=y|interruptible=y}} | ||
= | {{MvSubNavMario|g=SSBB}} | ||
[[Category:Mario (SSBB)]] | [[Category:Mario (SSBB)]] | ||
[[Category:Forward tilts (SSBB)]] | [[Category:Forward tilts (SSBB)]] | ||
Latest revision as of 21:24, May 21, 2024
| Mario forward tilt hitbox visualizations | ||||
|---|---|---|---|---|
| ↗ | 
| |||
| → | 
| |||
| ↘ | 
| |||
OverviewEdit
While very fast in start-up and ending lag, the move's poor reach limits its capability as a spacing move. It mainly serves as a quick punish attack, though with its low damage output and knockback, and having no followup potential, it doesn't accomplish much when landed. It has slightly more base knockback when aimed down, though the move still won't have real KO potential under 200%, and the increase in base knockback is far from enough to make it useful for hitting opponents off the stage. Overall, while it's not a terrible move, it's not very useful, and it pales in comparison to most other forward tilts.
Post hit dataEdit
| Hitbox | Base knockback | Knockback scaling | KO percent with poor DI | KO percent with no DI | KO percent with good DI |
|---|---|---|---|---|---|
| Angled side, angled up | 1036 | 23.687 | 199.01% | 218.01% | 244.40% |
| Angled down | 1197 | 23.687 | 192.22% | 211.21% | 237.60% |
HitboxesEdit
TimingEdit
| Hitbox | 5-7 |
|---|---|
| Interruptible | 25 |
| Animation length | 32 |
| Lag time |
Hitbox |
Interruptible |