Shield Breaker
- This page refers to one of Marth's attacks. For the hitbox property that allows fast shield breaking, see shield damage. For information regarding combos that break shields, see shield break combo.
| Shield Breaker | |
|---|---|
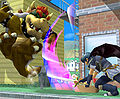
| File:Sheild Breaker.jpg Shield Breaker in Brawl. | |
| User | Marth |
| Universe | Fire Emblem |
| “ | [Marth's] Shield Breaker gains power the longer it's held. | ” |
| —Marth's trophy description in Melee | ||
The Shield Breaker (シールドブレイカー Shīrudobureikā) is Marth's neutral special move. It is functionally similar to Roy's Flare Blade. Shield Breaker charges much more quickly and does not deliver as much damage and knockback, but does not deal any recoil to Marth. It does not yield an explosion, as the Flare Blade does when fully charged. True to its name, it deals high shield damage, and will break any shield when fully-charged.
In Super Smash Bros. Brawl, the move has had a change in animation. Instead of an overhead vertical slash with a large arc area, it has become a single powerful stab. The style used now is much more in kind with Marth's battle animations in the Fire Emblem games. This is to reference Marth's game: Fire Emblem, released in Japan only.
The damage of the attack is the same, but it is much more easily sweetspotted because of the animation. It is also much faster, also making it easier to sweetspot. It now has higher knockback when not sweetspotted. The only downside is that it is harder to hit people with.
A fully charged Shield Breaker used in the air can be used to aid recovery if it is performed when Marth is knocked in the very top left or right position of the screen/stage as makes him move forward quite a bit. Not fully charged also moves forward but much less. After performing Shield Breaker, Marth can still use his up special move to further aid his recovery.
Strangely, although it breaks shields, it can be perfect shielded. This attack is also more predictable because it now makes a small sound during the attack. A not fully charged attack makes a single clashing sound, but a fully charged one makes a louder clash that seems to echo.
Reverse Shield Breaker
In Brawl, most neutral special moves can be reversed by tapping the control stick in the opposite direction a few frames after the neutral special move has been activated, Marth's Shield Breaker can be reversed with no increase to damage, knockback and has no reverse animation, this makes reversing only useful if it is used to attack behind Marth. It is interesting to note that when in Marth's running animation and activating a reverse Shield Breaker, Marth will turn around and slide forward a little while charging or releasing the attack, this is probably because the running momentum has switched direction with Marth since there is no animation for the reverse Shield Breaker and pushed him forward as if he didn't turn around at all.
Stages
In Brawl Shield Breaker has stages of damage and knockback, the stages change when the attack is charged until it reaches the last stage then the attack will commence. The are four stages in total with Shield Breaker, stages 1-3 are during the charging process, these stages always do the same damage even if the attack is tipped, tipping these stages will only increase knockback. Stage 4 is when the move is fully charged, this attack has mulitple hitboxes which get stronger to the tip of the sword. The stages on can be determined by listening to the "clack" sounds Shield Breaker makes, stage two commences on the third "clack" and stage three can be performed by predicting the fifth "clack". Stage three is difficult to perform because there are only a few frames before the shield breaker is fully charged, attacking in these frames will let the player use this attack. Stage four is when the attack is fully charged, this attack is the strongest in both knockback and damage (unlike most chargeable moves, which have the penultimate stage as the strongest).
| Stage | Damage | KO percent (base) | KO percent (tip) |
|---|---|---|---|
| Stage 1 | 8% | 216% | 184% |
| Stage 2 | 13% | 136% | 115% |
| Stage 3 | 18% | 94% | 78% |
| Stage 4 | 18%-24% | 68% | 50% |
Gallery
Shield Breaker in Melee
