Peach (SSBU)/Final Smash: Difference between revisions
From SmashWiki, the Super Smash Bros. wiki
Jump to navigationJump to search
Derekblue1 (talk | contribs) (A miracle, I did not know there was a Final Smash hitbox. WOW) |
Derekblue1 (talk | contribs) No edit summary |
||
| Line 8: | Line 8: | ||
==Hitboxes== | ==Hitboxes== | ||
{{technical data}} | {{technical data}} | ||
{{UltimateHitboxTableHeader}} | |||
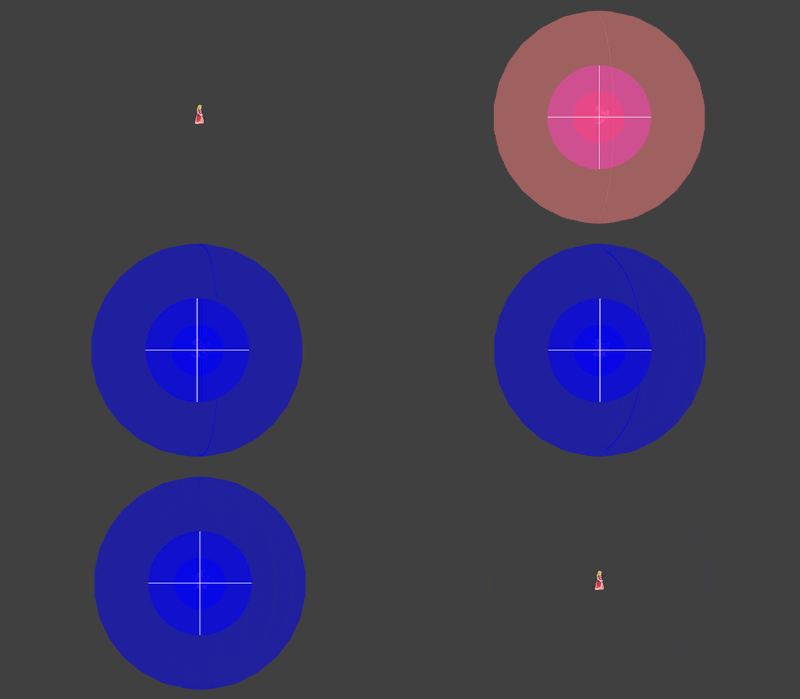
{{HitboxTableTitle|Close|50}} | |||
{{UltimateHitboxTableRow | |||
|id=0 | |||
|damage=30% | |||
|angle=361 | |||
|bk=0 | |||
|ks=0 | |||
|fkv=0 | |||
|r= | |||
|bn=Body | |||
|xpos=0 | |||
|ypos=0 | |||
|zpos=0 | |||
|ff= | |||
|clang=False | |||
|rebound=False | |||
|effect=Sleep | |||
|type=Typeless | |||
|sfx=None | |||
|slvl=S | |||
|hitbits=None | |||
|hitpart=None | |||
|blockable=False | |||
}} | |||
{{HitboxTableTitle|Mid|50}} | |||
{{UltimateHitboxTableRow | |||
|id=0 | |||
|damage=20% | |||
|angle=361 | |||
|bk=0 | |||
|ks=0 | |||
|fkv=0 | |||
|r= | |||
|bn=Pelvis | |||
|xpos=0 | |||
|ypos=0 | |||
|zpos=0 | |||
|ff= | |||
|clang=False | |||
|rebound=False | |||
|effect=Sleep | |||
|type=Typeless | |||
|sfx=None | |||
|slvl=S | |||
|hitbits=None | |||
|hitpart=None | |||
|blockable=False | |||
}} | |||
{{HitboxTableTitle|Far|50}} | |||
{{UltimateHitboxTableRow | |||
|id=0 | |||
|damage=10% | |||
|angle=361 | |||
|bk=0 | |||
|ks=0 | |||
|fkv=0 | |||
|r= | |||
|bn=Pelvis | |||
|xpos=0 | |||
|ypos=0 | |||
|zpos=0 | |||
|ff= | |||
|clang=False | |||
|rebound=False | |||
|effect=Sleep | |||
|type=Typeless | |||
|sfx=None | |||
|slvl=S | |||
|hitbits=None | |||
|hitpart=None | |||
|blockable=False | |||
}} | |||
|} | |||
==Timing== | ==Timing== | ||
{{technical data}} | {{technical data}} | ||
Revision as of 15:03, December 1, 2022
Overview
Peach's Final Smash is Peach Blossom. Peach performs a dance, causing all of her enemies to fall asleep. The closer they are to her when she activates it, the more damage they will take and the longer they will slumber. Three giant peaches appear, healing 20%. While asleep, Peach can take advantage of charging her forward smash to the maximum (or hit them straight away if they are about to wake up). It must be noted that the sleeping victims will mash the buttons in order to set free. This Final Smash fails to affect anyone outside the range of the screen borders.
Update History
 Peach Blossom has a slightly reduced sleep time period (clean: 260/200/160 (scaling) → 230/130/100, late: 210/170/140 (scaling) → 200/130/100).
Hitboxes
Timing
|

